Several Useful Tips

  • Bubble context-sensitive help explaining their function is available for most controls. If it bothers you, it can be turned off in the settings, but it is still available by pressing the question mark on the toolbar or on the window titlebar, or using the menu Help / What is ...
  • A brief description of the meaning of individual menu items is displayed on the status bar (bottom) of the main application window
  • Each installation also includes a PDF manual, you can find it in the Windows start menu / Montax Imposer
  • Features such as step and repeat, scale, signatures, and more are available through palettes that you can access from the menu Window (some are only available in Expert mode)
  • You can streamline the program and adapt it to your needs in several ways: in the Standard mode and especially in the Expert mode, more features and palettes are available compared to the Auto mode. Some palettes allow you to display only part of the controls (press button Expand to display all), you can use the button Menu to hide unused marks or features on the Marks Palette (and on the Imposition Appearance Palette in Expert mode), and toolbars can be customized using the arrow on the far right of the toolbar. You can close unused palettes and toolbars, place used ones to the left or right of the work area, or above it, or float anywhere (with a few exceptions – horizontal Info Palette cannot be placed left or right, some palettes are always floating)
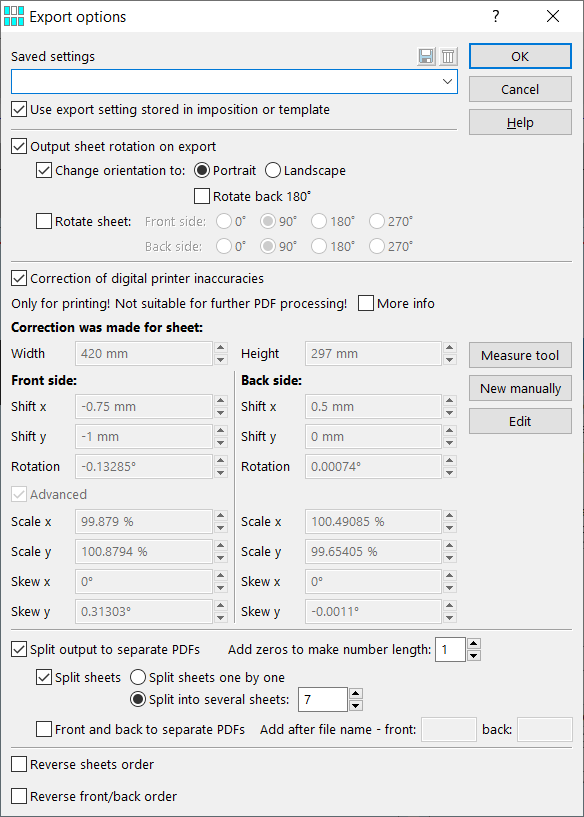
  • You can use the Export Options (right-click the export button or use the File Menu) to rotate the front and/or back side of the sheets, split them into separate PDFs, reverse their order, or correct inaccuracies of the digital printers
  • If the program does not display queries that were previously displayed, check in Settings / Restore undisplayed dialogs if you have not checked "Do not show again" for any query
  • Different values ​​of spaces, widths and heights of individual rows or columns can be entered after displaying the rulers by double-clicking on the value you want to change
  • Using custom objects, you can add basic geometric shapes, crosses, marks, text, numbering to the resulting PDF, and in the case of VDP extension, also references to variable text from the data file, links to variable PDF or images, or barcodes. They can also be used to realize collation marks for signatures (objects can be set to move when changing a signature)
  • The output PDF has a trimbox set according to the imposition. For offset printing and output to CTP may be appropriate to use the Printing Plate Palette, the trimbox is then set to PDF size, ie the same as the printing plate (available in Expert mode)
  • All sheets in one imposition have the same size and other parameters. If you need to use different sheets or change their layout, use more impositions and, if necessary, automatic page assignment to more impositions (available in Expert mode)
  • The symbol Warning alerts you to a problem: for example, on the Marks Palette, warns that marks or crosses do not fit on the sheet margin, on the Info Palette next to the bleed informs about insufficient margin size for the bleed, in custom object editing mode may indicate that the mark is not displayed, missing PDF or incorrect data for the barcode. After placing the cursor on this symbol (or by clicking on it), a description of the problem is displayed. For information of other errors and warnings, see Imposition Check Palette

User Templates Palette

Templates Menu

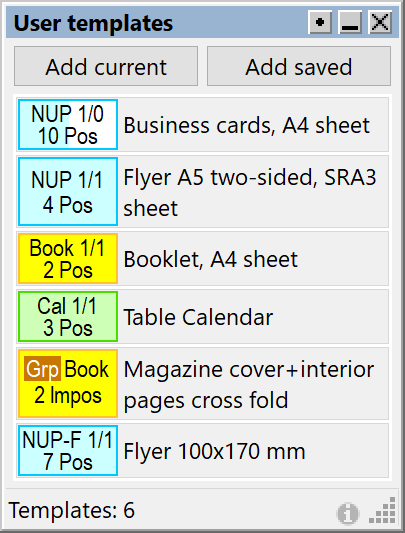
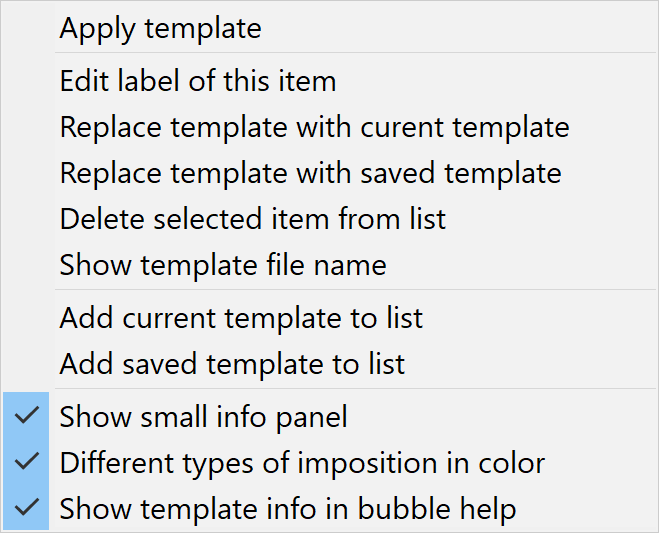
On this palette, you can place buttons that refer to templates that you use frequently. You can place a template according to the currently opened imposition or a previously created template on it. When placing the currently open imposition, this imposition will be saved as a template using the Save dialog (you are prompted to select the location and name of the template file to be saved, which will be opened when you press the palette item). If you want to place a previously saved template on the palette, the Open dialog will appear to select the template file (or imposition, in which case the file is used as a template, i.e. without pages for imposition). You can then enter a name under which the template will be placed on the palette (it may differ from file name). This name can be changed using the context menu after pressing the right mouse button. In this menu you can also change the file used as a template (again, it can be replaced with the current imposition or a previously saved file), the button can be removed (the template file will be preserved) or just show the template file name. A small information panel with basic information about the template is displayed before the name of the palette – type of imposition (for Free layout supplemented by "F"), whether it is one-sided or double-sided, the number of positions (added "A" for automatic number of positions). If there are several impositions in the template, "Grp" (inverted colors), imposition type (or "Diff" if impositions are different) and number of impositions are displayed (possibly supplemented by "F" for variable or "d" for mixed variable and tabular impositions). You can find more information in the bubble help of this info panel (when hovering over the panel). Individual types are color-coded, one-sided imposition is only half colored. This color differentiation and the entire info panel can be turned off in the menu. Individual buttons can be moved up or down in the list (using the mouse button and dragging), the missing template file is shown in red. The palette is primarily intended for templates (without pages for imposition), but it can also be used for impositions (i.e. including pages). The current imposition incl. pages can be added by pressing the right mouse button on the Add current button, for previously saved impositions (Add saved button), the pages are already saved in the file. If there are pages in the linked file, the "Open as imposition" item will be added in the context menu for opening including pages.

Note when using more impositions (tabs bellow the work-area): as always when opening a template, if the template contains only one imposition, it is only used for the current imposition. However, if the template contains multiple impositions, it is opened in its entirety, i.e. all impositions are replaced by the template. The context menu allows, if there is only one imposition in the template, to remove the other open impositions (in fact, to use this template instead of all open impositions).

Align palette

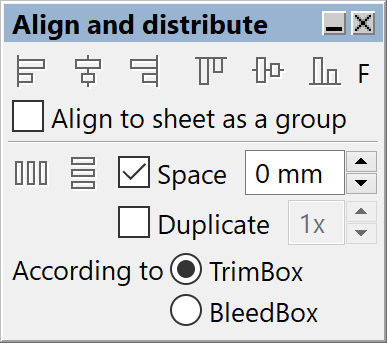
Align and distributeThe palette is only active for position layouts in Free Layout mode and for objects in Custom Objects mode.

The upper six elements of this palette can be used to align positions in Free Layout mode as well as Custom Objects (applies to both positions and objects: the last selected position remains in place, the others are aligned to this position; if the last selected position cannot be determined, e.g. when selecting by dragging a rectangle, the positions are aligned according to the bounding box of all selected positions). If the sheet is two-sided, the letter F (front) or B (back) appears, indicating alignment on either the front or back side (we recommend not to combine front and back). A red highlight indicates that alignment is not possible for a small number of selected items on this side (see bubble help; cannot align a strip object). When aligning objects assigned to positions, the object at the last selected position is aligned. The Align to sheet as a group option does not align positions to each other, but shifts them relative to the sheet (based on the bounding box of the selected positions). The other two options allow you to distribute positions horizontally or vertically – the outermost selected position will remain in place and the others are distributed (so at least 3 positions must be selected) or when the Space option is activated, the set gap between positions is observed (at least 2 positions). The following Duplicate option also applies to both horizontal and vertical symbols. All of the above applies similarly to Custom objects, with the difference that positions can be aligned and distributed according to trim or bleed, while objects according to dimensions including or without a line. Objects are aligned once, based on the current dimensions of the sheet and positions, but it is not guaranteed that they will be aligned even after changing these dimensions.

Guidelines

Guidelines can be created by dragging from Rulers. After creating a guideline or after selecting it with the mouse, the location of the guideline can be edited on the Info Palette. You can set Show guidelines, Snap to guidelines and Lock guidelines (then they cannot be selected with the mouse) in the View Menu.

Overview of Main Features

The overview also describes functions that are only available in standard or expert mode, with the VDP extension and in the ProHot edition of the program.

Program mode

  • Auto (only basic features, simple imposition)
  • Standard (common use, more features)
  • Expert (all features are available)
  • Tabular Layout of positions
  • Free Layout allows arbitrary placement, orientation and size of positions

Imposition appearance settings

  • Types of imposition: N-UP from start, Booklet, Calendar
  • For all types of imposition, you can set Cut & Stack, or an automatic cutter
  • The size of the positions is determined automatically by the pages or you can set it manually
  • The filling of positions on the sheet is automatic (you can select the first position, set the order of filling the positions, Work & turn) or you can manually assign pages to positions (e.g. by dragging from the pages palette)
  • Pages larger than positions are cropped to the size of positions (can be turned off, then pages can overlap)
  • The orientation of positions in Booklet mode can be the same (top of positions are oriented in the same way, for cutting before further processing) or for a cross fold
  • You can also set the imposition margin, row and column gaps, bleed and bleed limit of imported pages
  • It is possible to rotate a sheet or position, rotate the back side of the position compared to the front by 180°, duplicate imposition or positions, delete a row, column, in Free layout the order of positions can be changed in the context menu
  • Sheet size can be automatic or set directly on the sheet palette, or you can use and modify the saved sizes, set the imposition alignment on the sheet
  • You can set the number of page repeats, fill all positions, repeat pages from the beginning or only the last page
  • Scale can be set in %, fit, fill, non-proportional fill
  • Uniform back side feature ensures that the back side is the same on all sheets
  • Correction of the paper thickness is realized by shifting the inner sides inwards, the outer sides outwards or by narrowing the inner sides
  • Sheets can be grouped into signatures, or several sheets can be folded at once
  • Printing plate is designed for CTP output, it sets the TrimBox to PDF size

Various Marks and crosses can be added to the sheet

  • Marks (trim, center, bleed), crosses (registration, inside sheet, around positions in free layout), color bar, gray bar, strip, lines between positions, sheet description, mark for automatic cutters, custom PDF
  • You can also adjust the sizes, distances and other details of marks

More impositions

  • The added imposition can be a copy of the current one or loaded from a template. Each imposition has separate settings
  • For multiple impositions, individual impositions can be separate (manually assigned pages to individual impositions by marking on the pages palette) or linked, and the assignment of pages to impositions is then controlled by limiting the number of sheets of individual impositions

Custom objects can be added to the sheet:

  • Numbering, text, PDF, sidelay mark, strip, barcode, cross, rectangle, line, ellipse
  • The object can be saved for repeated use
  • For objects, assignment to sheet, trimbox, selected or all positions, rotation of the object together with the sheet, arrangement of objects (forward/backward), show on front, back, on all sheets, on the first, on the last, on the group first sheet, on the group last sheet, on selected sheets, only on sheets on which the specified page is shown, alignment left, center, right, up, down, distance or move the object with the mouse, move the object on the next sheet or signature, fill and line color including overprint and line properties, object as unprintable, for objects assigned to the position and imposition type booklet alternative left/right alignment of even and odd sides, objects can be rotated by any angle, interactively (mouse) change location, angle and size
  • Numbering: ascending and descending, only until pages are exhausted or pages will be repeated
  • Text: insert symbols or data fields into the text, parts of the text can be formatted differently
  • PDF: both the file and the page number in the file can be static or a link from a data field
  • Barcode: static, data field or combination of static text, predefined symbols and data fields; many types and variants
  • There is a function to find the shortest, longest and incorrect objects
  • When using numbering or variable data, you can choose to repeat all or just the last page for imposition

When working with pages for impositions you can

  • When importing pages (PDF or images), replace current pages, add new pages to the end, insert them before the selected page, create a new group of pages
  • On the pages palette, set the size and type of page preview, display the list of pages and files
  • Mark pages for imposition, set automatic page rotation, delete and duplicate pages, insert blank page, reverse page order, open page in application, set repeat, scale, page rotation (all take precedence over imposition settings), change page trimbox and bleedbox
  • Edit a page placed in the selected position on the sheet, adjust the dimensions of the position according to the page
  • Create a new group of pages directly or when importing pages, rename or delete the group. Individual groups are imposed separately, groups are assigned to a sheet manually (e.g. by dragging from the page palette)

Other features

  • You can select an imposition from the predefined Imposition presets
  • You can add frequently used imposition layouts to the User Templates palette
  • The imposition can be saved, you can also save it as a template (ie without pages for imposition)
  • When using numbering or variable data, the static background and variable foreground can be exported separately
  • Export options allow you to rotate the sheet during export, reverse the order of sheets, split the output PDF by groups or individual sheets, correct the inaccuracy of the digital printer
  • Zoom can be changed using tools, keyboard shortcuts, and the mouse wheel
  • It is possible to display previews, lines, dimensions, change the colors displayed on the desktop
  • Rulers facilitate orientation in dimensions and also allow you to add guidelines, by double-clicking the value on the ruler you can change the size of individual positions and gaps
  • Guidelines can be created by dragging from rulers, you can set snap to guides, sheet, position, automatic guides (pages in free layout mode or custom objects)
  • You can also use the tool for Align and distribute of positions on the sheet (in free layout mode) or custom objects
  • Imposition check is available, it is possible to set the meaning of individual control items
  • Variable data import allows you to set field and record separator, ignore first record, empty records, field names can be in the first record
  • It is also possible to backup, restore and reset program settings
  • You can create Shortcuts for menu items and other functions
  • Watched folders (hotfolders) allow automatic template-based PDF generation. The template and other properties can be modified using the control XML

Starting the program

  • Montax Imposer – standalone application can be started with parameters defining the file for imposition or the template, e.g. when running from the command line, using a shortcut or script, see Workflow
  • Montax Imposer – plug-in must be run from Adobe Acrobat environment (Menu/Plug-Ins/Montax Imposer)

Backup/Restore Settings

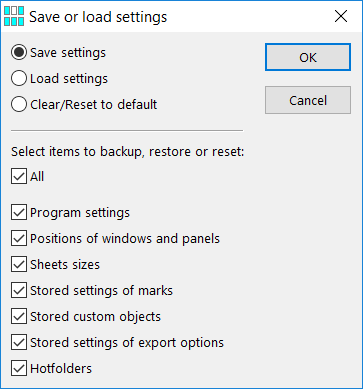
Backup/Restore SettingsThis function allows you to save the current settings to a file and also restore them from the file, or transfer settings to another computer. You can choose which settings will be saved or restored. You can also save and restore watched folders in the edition ProHot. It is also possible to restore the default settings of the program.

Export Options

Export Options

This feature is available from the File Menu and also by the right-click on the Export icon.

You can save export settings in the program for later use in other impositions – these settings appear in the drop-down list and can be selected again or extended with new ones at any time. In addition, export settings are always saved automatically into the imposition or template file. Settings saved in the imposition are applied only if the option Use export setting stored in imposition or template is active (as well as in the case of imposition using the watched folders). If the option is not active, the current global settings from the program remain in effect. An ‘indeterminate state’ of the option means that the export settings were modified compared to the imposition (and will be used).

The first option allows you to set the rotation of the imposition sheet on export, either rotate it to always be portrait or landscape (or you can set the rotation of the back 180˚ against the front) or rotate the sheet by the specified angle.

Split output to separate PDFs divides the export into multiple files. If the sheets are splitted into separate PDFs, _1, _2, _3, etc. are added after the file name. It is also possible to set the minimum number of added digits (eg _001, _002, ...).

Reverse sheets order can be useful for further processing. Reversing order within a signature refers to the signature (groups of sheets) settings in the imposition; if signatures are not enabled, the entire imposition is considered as a single signature.

Correction of digital printer inaccuracies

For digital printers, the print is often shifted and even rotated compared to the original. This can be very undesirable for duplex printing, when the front and back side shifts are added up and the resulting difference can even be 3 or 4 mm. In the case this shift is constant, it can be corrected by shifting (or even rotating) the PDF content in the opposite direction. The effectiveness of this correction, of course, depends on other factors, especially on the printer feeder: the shift (or rotation) must always be the same. It also depends on the paper loading into the printer. In some cases (depending on the printer's design), the tolerance for paper loading is even 2 mm. However, if the paper feeder is OK and you eliminate the inaccuracies of the paper loading (you always load it the same way), it is usually possible to reduce the difference of printing front and back side to 0.5 mm or less.

The program allows 2 correction versions: standard and advanced. In the standard version, X and Y axis and sheet rotation can be set independently for the front and back side. In most cases, this correction is sufficient. Sometimes, however, printing is also deformed (for example, scaled up or down in one axis), then it is better to use advanced correction. Parameters of this correction are difficult to estimate, so we recommend using a tool to measure this correction (of course it can also be used for standard correction).

Correction is related to the orientation of the resulting PDF, it will probably be different for the portrait and landscape orientation of the sheet. Therefore, it may be useful to use the Change orientation option, the orientation of the resulting sheet will then be independent of the imposition sheet orientation and the correction will be correct. Correction can be saved for future use (including setting of the sheet rotation on export). The use of the correction depends on the printer: sometimes correction can also be applied to other material, paper size, and tray than what the correction was measured for, sometimes cannot. Therefore, these properties should be used in the correction name.

Use the Edit button to change the correction parameters. Changes you make here will be saved in the imposition file and used for printing, but will not be automatically saved to the "Saved settings" (if you use them). The character * after the setting name indicates a change from the stored values. The current setting can be saved by pressing the diskette button. Attention: As mentioned above, the correction is related to the PDF orientation. Therefore, the values of the sheet rotation during export are also part of the correction. If you change the rotation in edit mode, this changed rotation will be understood as the default rotation for which the correction was measured and thus the original correction may still be invalid. However, if you change the rotation and the edit mode is inactive, the default rotation of the correction will not change, but the program will apply the correction to the current rotation (the original correction will still be valid). Pay attention to any information next to or below the text "Correction was created for sheet:" - if the correction was made for a different orientation or rotation of the sheet, a warning will be displayed here. You will find the same warning when exporting a PDF. Recommendation: in short, do not change the orientation in edit mode.
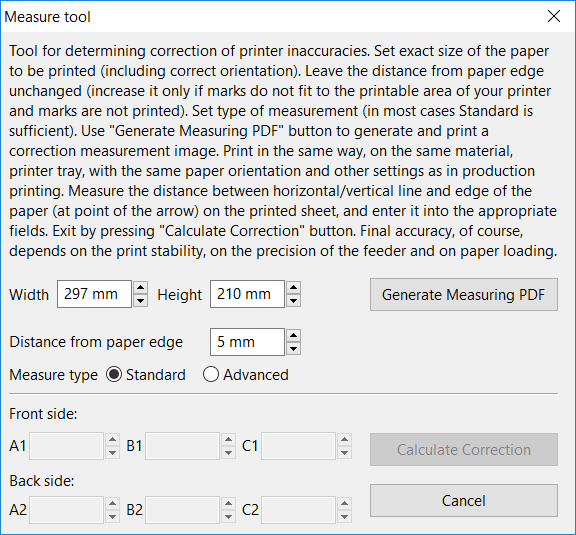
Measure ToolMeasuring PDFMeasure tool for determining correction parameters

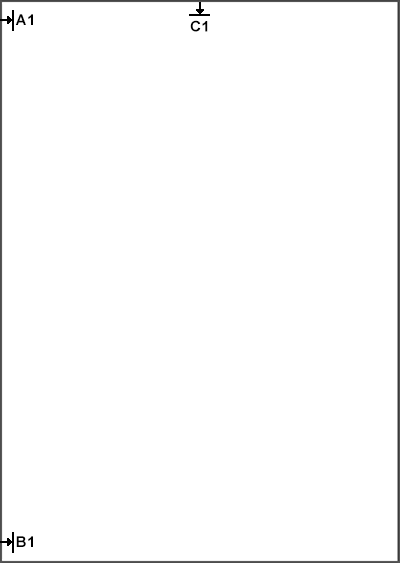
You need to specify the paper size for which we will measure the correction. It is important to enter the correct orientation (do not mistake height and width). The Generate Measuring PDF button will generate a PDF with marks. Print this PDF in the same way as production printing (on the same material, from the same tray, with the same paper orientation, etc.). The PDF has two pages, the marks on the first page are used to measure the front side, on the second side for the back side. If the nonprinting margin of your printer is larger and some measurement lines are not printed, increase the distance from the edge of the paper and generate and print the PDF again (always measure the PDF currently generated and printed). Then, measure the distance of the horizontal (or vertical) line from the edge of the paper as accurately as possible and enter the values (A1, B1, C1 for the front side, A2, B2, C2 for the back side, or A1 to H1 and A2 to H2). The correction is then calculated and transferred to Export Options form by pressing the Calculate Correction button. You can see an example of the measuring PDF in the image.

When you export the resulting PDF, information about the correction used including any incompatibility warning is displayed if the correction is applied. Here you can select a different correction, turn it off or display Export Options.

Tips for correct correction:

Set the rotation of the sheet before measuring the correction (if you use the rotation). The correction is related to the orientation of the imposition sheet, the resulting PDF, and rotation. The same correction can be used when the sheet is rotated 180˚ from the measured sheet, but not when the sheet is rotated 90˚.

Check that the correction is correct. Sometimes, the printer randomly shifts the paper, and if the paper so shifted (differently shifted from the other) is used for measurement, the correction may be unusable and must be repeated. This is often the case, for example, with the first and last paper in the tray. The sheet to be measured should never be in the tray alone. It is difficult to load it exactly as a block of paper, and it is easy for the feeder to take it somewhat differently.

The accuracy of printing also depends on the paper size, whether it matches the imposition sheet and the paper size set on the printer.

Spot Colors

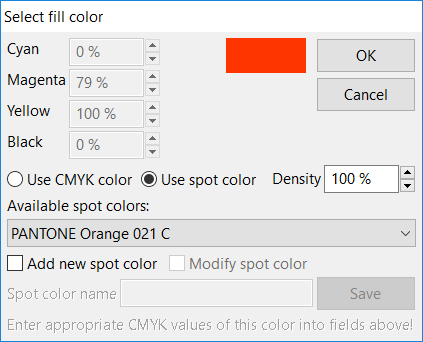
Custom colorsCMYK colors and spot colors can be used for custom objects. You can use spot colors that are used in PDF for imposition or user-defined colors. The program does not include libraries with color definitions and their appearance, but can take these colors from PDF for imposition – all the spot colors used in the PDF for imposition are available in the spot color list. These colors taken from PDF cannot be edited, they can only be used in different densities.

It is also possible to add a user-defined spot color. It is necessary to specify name of this color and it is also necessary to define its appearance (for displaying on the monitor and composite printing) by entering equivalent CMYK values. The user-defined color is shown in the spot color list with a prefix "User defined:" and its appearance (CMYK values) can be modified. However, if it is imported a PDF for imposition containing a spot color with the same name later (after defining this color), the color used in the PDF is used as the color definition (the PDF color definition always takes precedence).

Barcodes 1D and 2D

Available only with Variable Data Printing Extension.

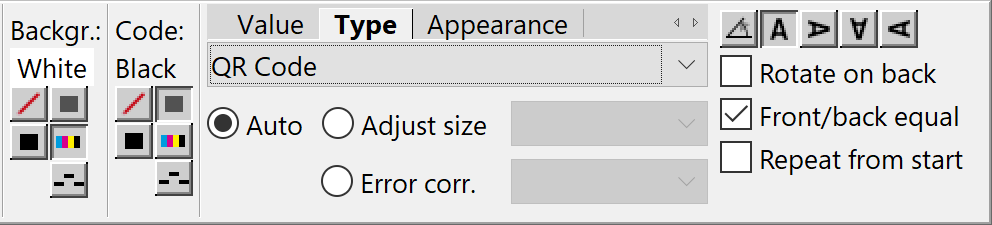
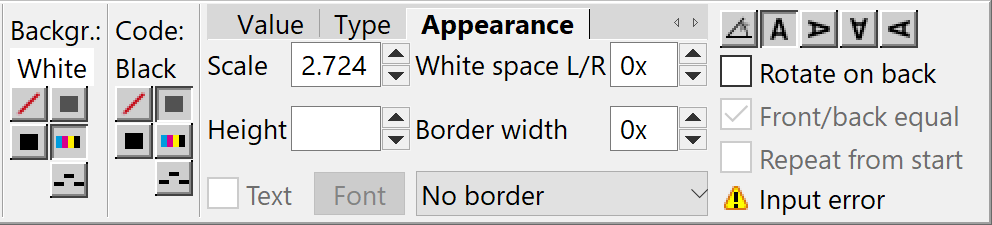
Info paleta - čárové kódy

Čárové kódy – typ

Čárové kódy – vzhled
It is possible to add 1D (eg. EAN) and 2D (eg. QR code) barcodes using custom objects. With this feature, many different types of codes can be added to the output PDF. This code can be constant (eg. to control the print production process) or variable (as a part of the resulting printed matter). You can set the size, color and other code parameters.

The individual property groups are available using Value, Type, and Appearance tabs.

The Custom value for code generation you can enter to the text field. This value can be static or you can use a combination of text and fields from a data file (similar to a text object). You can show box for easy editing this value. Another option is to use the name of the input PDF, either the whole name or a part from beginning or from end. The last option makes it easy to use single field value from a data file field for code generation. It is possible to set the number of repetitions of the same record from the data file, whether the same record will be used on the back side, whether pages for imposition are repeated from the beginning if all pages are imposed or if only the last page is repeated. It is possible to set rotation of the code and whether it will be rotated 180° on the back.

Select the second tab to set the code type and its properties. These properties are different for individual codes, some codes do not have any properties. The last tab allows you to set scale, height of some linear codes and their border (these parameters are set as a multiple of the module size – the smallest element size – lines, spaces, etc.). Some codes need white space (in background color) left and right, you can set also border around the code in background color or in code color. For some codes (e.g., EAN), you can add human readable text.

Different code types require different values – some must be only numeric, some can contain ASCII characters, others require a fixed length, etc. The GS1 codes require the AI identifier entered using [square bracket] notation. The additional code for the EAN code can be entered behind the main value after the + sign. Check digit is calculated automatically, but can be entered manually too (for most codes that contain a check digit). If the code cannot be generated on the currently displayed sheet, the warning triangle with an error description is displayed right bottom (click on it or in bubble help).

Supported codes: Australia Post, Aztec Code, Aztec Runes, Channel Code, Codabar, Codablock-F, Code 11, Code 128, Code 16K, Code 2 of 5 Data Logic, Code 2 of 5 IATA, Code 2 of 5 Industrial, Code 2 of 5 Interleaved, Code 2 of 5 Matrix, Code 32, Code 3 of 9 (Code 39), Code 3 of 9 Extended , Code 49, Code 93, Code One, Data Matrix ECC200, Deutsche Post, DotCode, Dutch Post KIX Code, EAN, Facing Identif. Mark (FIM), Flattermarken, Grid Matrix, GS1-128 (UCC.EAN-128), GS1 DataBar, ITF-14, ISBN, Japanese Postal Code, Korean Postal Code, LOGMARS, Maxicode, MicroPDF417, Micro QR Code, MSI Plessey, NVE-18, PDF417, Pharmacode, Pharma Zentralnumber (PZN), PLANET, PostNet, QR Code, Royal Mail 4 State (RM4SCC), Telepen, Plessey Code, UPNQR, UPC A, UPC E, USPS OneCode, DAFT Code, including formats used in health industry.